The first time I repotted my monstera I made every mistake possible. I used the wrong pot size, wrong soil, wrong timing. Just everything you can think of I got wrong.
The poor plant ended up sulking for weeks. It resulted in a few yellow leaves, no new growth and me left wondering what had gone wrong.
And if you’re here reading this you’re probably trying to avoid the exact same thing happening.
I can give you some good news quickly though – repotting a monstera is really not that complicated once you know what you’re doing. But there’s a lot of vague advice out there (give it fresh soil! go up a pot size!) that doesn’t tell you the real specifics of what to do.
I mean, how much bigger is a “bigger pot”? What soil, exactly? And what do you do when the roots look are growing out of the drainage holes in the pot?
Well this guide covers all of that. The when, the how, the what to do if it goes wrong. Monsteras are tough plants and they can handle being repotted, as well as benefitting from it. You’ve just got to do it right.
Quick Answer
- Choose a Slightly Bigger Pot: Pick a pot that’s about 1 to 2 inches wider than the current one and make sure it has good drainage.
- Refresh the Soil: Remove the plant, loosen the roots and put it in fresh, well draining potting mix.
- Water and Support: Water lightly after repotting and add a moss pole or stake if the plant needs some support.
How to Know When Your Monstera Needs Repotting
This is where most people go wrong – they repot too early, or too late, or just on a schedule without looking at what the plant needs. Monsteras don’t follow a calendar.
They grow on their own timeline and that timeline depends on the light their getting, how and when they’re watered, the season and a dozen or so other variables.
That said, there are some pretty good signs that it’s the right time.
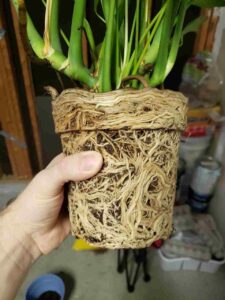
The Roots Are Coming Out of the Drainage Holes
This is the most obvious one. You’d have to try really hard to miss it.
Just turn the pot over and look at the drainage holes – if the roots are growing out, working their way through or forming a sort mat on the outside then your monstera is showing you it has nowhere left to go. It’s not an emergency or time to panic but it is a clear signal.
Worth noting: one or two roots coming out isn’t always cause for alarm. Monsteras do this sometimes just because a root found the hole. So before you panic check to see how bad it is.
The Plant Is Drying Out Way Faster Than It Used To
When a pot is more root than soil it means there’s a lot less medium to hold on to water. So if your monstera seems like it needs water all the time and is dry again a few days after being watered that’s a big sign the roots are overgrown.
I noticed this with my own monstera before I even looked at the roots. It went from needing water every 10 days to needing it every 4 or 5.
Roots Are Circling the Bottom of the Pot or Growing Above the Soil
Take the plant out of its pot and look at the root ball. If the roots are pushing up through the top of the soil or growing in a circle at the bottom of the pot that shows you the plant is root bound.
This isn’t instantly a crisis – monsteras can tolerate being a little bit pot bound – but at this stage they’re not going to put energy into growing their leaves. They’re just surviving.
Growth Has Slowed Down Noticeably (During the Growing Season)
If it’s the spring or summer and your monstera hasn’t grown any new leaves in months and the light and watering haven’t changed then it definitely could be the roots being too cramped. A root bound monstera doesn’t have room to expand so it just stops.
This is more difficult to diagnose because slow growth can have other causes. But if you find it along with any of the above signs then it’s probably time for a repot.
When NOT to Repot
Don’t repot in the winter unless you absolutely have to. Monsteras slow right down in the colder months and repotting stresses the plant at exactly the time it has the least energy to recover.
So try to do it in spring if possible – when you start seeing new growth is best. The plant is already getting ready for an active season and it’ll adapt to its new home much faster.
What You Need Before You Start
Getting this stuff together before you start is worth it. Trying to find a trowel while you’re holding a root ball and there’s soil everywhere isn’t going to help you feel relaxed about the repot.
- A new pot – 2 inches bigger in diameter than the current one (more on this further down)
- Fresh potting mix – a well draining mix that’s chunky is best
- Perlite or orchid bark (to mix in if your soil doesn’t have good air flow)
- Something to water with after you’ve repotted
- Gloves if you’re sensitive – monstera sap can cause irritation to the skin
- Newspaper or a tarp to keep the mess in (or do it outside)
- Optional: a moss pole or stake for support if your plant is getting big
Choosing the Right Pot Size
Only go up a size. It might feel counterintuitive – you’d think a bigger pot would mean it has more room to grow – but a pot that’s too big just makes more problems.
All the extra soil holds on to moisture the roots can’t get to yet, and so the moisture just sits there. Sitting in moisture will lead to root rot. And root rot is much harder to fix than a plant that’s a little pot bound.
Two inches wider in diameter is what you want. So if your monstera is in a 6 inch pot you’re moving it to an 8 inch. If it’s in a 10 inch, you go to a 12-inch. Simple as that.
Also: always use a pot with drainage holes. I can’t empathize that enough. A monstera sitting in standing water is a monstera that is heading for an early death.
What Soil Does a Monstera Need?
This matters a lot. Monsteras are come from rainforests in Central America and they grow in rich soil that’s quite loose on the floor of the forest. That soil drains quickly and never stays waterlogged. Standard potting mix straight from the bag will likely be too dense and hold on to too much moisture for them.
The best is a mix of:
- 60% good quality potting mix
- 20% perlite (for drainage and air flow)
- 20% orchid bark or coconut coir (for balancing the moisture)
If you want to keep it simple there are pre made “chunky” or “aroid” mixes you can buy that are formulated for plants like monsteras and pothos. They tend to work really well without any extra work on your part. But if you can then mixing your own gives you more control.
For a more full look at soil try this guide to the best monstera soil mix.
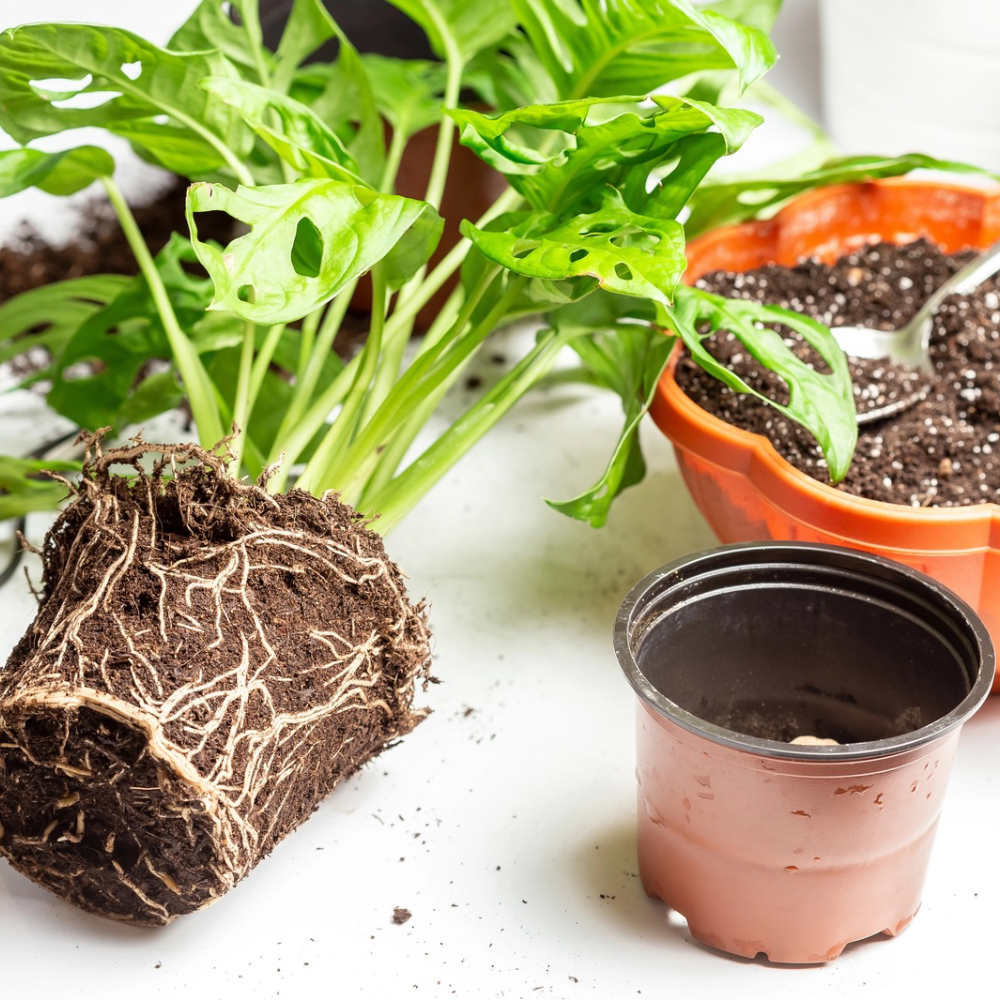
How to Repot a Monstera: Step by Step
Alright, let’s get into the main reason you’re here.
Step 1: Water the Plant a Day or Two Before
Repotting a monstera when the soil is slightly moist (not soaking wet but also not bone dry) makes the whole process easier. Moist soil holds the root ball together better when you remove it from the pot.
That in turn will mean you’re less likely to damage the roots. So water it a day or two ahead, let the excess water drain out, and you’re good.
Step 2: Lay Everything Out
Spread out your tarp or newspaper. Have your new pot ready with a bit of fresh soil in the bottom – enough to raise the plant to roughly the right height.
You don’t want the top of the roots sitting lower than the rim of the new pot, or much higher. Try to get the plant to sit about an inch below the rim so there’s room for watering without it overflowing.
Step 3: Remove the Monstera from Its Pot
Hold the base of the plant – the stems, not the leaves – and tilt the pot onto its side. Squeeze the sides if it’s a plastic pot.
The plant should slide out. If it doesn’t run a knife or trowel around the inside edge to loosen the soil from the walls.
Don’t pull it out by the leaves. I’ve seen this advice ignored and watched a beautiful monstera lose a whole stem that way. Hold the base and ease it out slowly and carefully.
If the roots are really stuck, like the whole root ball is shaped like the interior of the pot and barely moves, soak the pot in water for 30 minutes to loosen things up. It almost always works.
Step 4: Look at the Roots
Before you put anything in the new pot take a minute to look at the roots. This is important and a lot of people skip over it.
Healthy monstera roots are white or a sort of light tan color, will feel firm and have a slight give.
They should not smell at all. If you see roots that are brown or black, mushy, or have a nasty smell – that’s rot and you need to deal with it before repotting.
Trim any rotten or dead roots. Cut back to where the root is healthy and white.
Then let the cut ends dry out for 15 to 30 minutes before putting the plant in fresh soil. It might sound fussy but it makes a real difference.
If you see a tight coil at the bottom of the roots loosen it with your fingers. You can part some of the circling roots so they grow out into the new soil instead of continuing to spiral. This helps the roots to develop better in the future.
Step 5: Put the Plant in the New Pot
Put the monstera on top of the layer of soil at the bottom of the new pot. It should sit at roughly the same depth it was in the old pot. You don’t want to plant it any deeper. Check the height and change the soil underneath if needed.
Then backfill around the root ball with your fresh mix, pressing as you go. You want to get rid of any large air pockets – roots that sit in air don’t absorb water well – but you don’t want to pack the soil so tightly that air and water can’t move through it.
Fill to about an inch below the rim of the pot.
Step 6: Water Thoroughly
Once the plant is in its new pot water it thoroughly until water runs out of the drainage holes. This does two things: it settles the soil around the roots (filling any remaining air pockets) and it gives the plant a drink straightaway to help with stress from being transplanted.
Let all the excess water drain out completely before putting the pot back in its saucer. Don’t let it sit in standing water.
Step 7: Put It Back in Its Spot – Then Leave It Alone
Return the monstera to wherever it lives. Same light, same temperature, same everything.
Then you’re faced with the hardest part: leaving it alone.
Monsteras often go through a short period where they have to adjust after repotting. You might notice a leaf or two drooping or no new growth for a few weeks. This is normal.
The plant is putting its energy into settling its roots into the new soil. Don’t repot it again. Don’t move it to a sunnier spot thinking it needs a boost. Don’t fertilize it yet either. Just water it when the top inch or two of soil is dry and then wait.

What to Do After Repotting
It’s right after repotting that a lot of people make mistakes that stress the plant even more.
Don’t Fertilize
Wait at least 4 to 6 weeks before feeding your monstera after repotting. Fresh potting mix usually has slow release nutrients and adding fertilizer on top of those can burn the roots when they’re already sensitive.
When you do start fertilizing again use a balanced liquid fertilizer diluted to half strength during the growing season.
See
Keep It Out of Direct Sun
Even if your monstera usually lives somewhere bright keep it out of harsh direct sun for the first week or two after repotting. Bright indirect light is fine – even lower light is okay for a short period. Direct sun on a stressed plant can cause leaves to burn and that’s just adding insult to injury.
For more help see our guide to monstera light needs.
Don’t Overwater
This is the biggest mistake people make after repotting. They think a newly repotted plant needs more water so they start watering more often.
But the plant’s roots are still getting established in the new soil and if that soil stays wet then root rot can develop quickly. Stick to your normal schedule – water when the top couple of inches are dry and check before you water rather than watering on a fixed timetable.
See this guide for how to, how often and more when it comes to watering a monstera.
Expect a Pause Before New Growth
It can take anywhere from two to eight weeks before you see any new growth after repotting. Some plants bounce back in a couple of weeks; others take longer depending on the season and how stressed they’ve got from being repotted.
As long as the leaves aren’t turning too yellow and the soil is drying out normally then the plant is fine. It’s just getting settled.
Troubleshooting Any Problems After Repotting a Monstera
Leaves Are Turning Yellow
A leaf or two turning yellow after being repotted is pretty normal. The plant is just sending its energy elsewhere and some older or lower leaves get sacrificed.
But if you’re seeing a lot of yellow across newer leaves, or yellow and mushy stems then overwatering or root rot is more likely the issue. Check how often you’re watering and make sure the pot is draining properly.
See this guide for a more in depth look at causes of and fixes for yellow monstera leaves.
Leaves Are Drooping or Wilting
This often just means the plant is in shock from the move. Give it a few days.
If it doesn’t improve, check the soil – if it’s very dry, water it. If it’s very wet, let it dry out and improve the drainage. If the drooping carries on for more than a week and neither watering nor drying helps you’ll want to tip the plant out of the pot and check the roots for rot.
For extra help see our guide to drooping monstera leaves.
Plant Is Leaning or Falling Over
Big monsteras can get top heavy, especially in a new pot where the soil hasn’t fully settled around the roots yet. If your plant is leaning, use a stake temporarily like a bamboo cane until it becomes stable.
Or – if you haven’t already – this is a good time to add a moss pole. Monsteras love to climb and giving them something to grow up actually helps to get larger, more fenestrated leaves.
The Roots Smelled Bad or Looked Rotten When You Repotted
Root rot is something that your plant can recover from if you catch it early enough. Cut away all the affected roots (dark, soft, smelly) until you get to healthy tissue, let the roots dry out for half an hour and then repot it in fresh, well draining soil.
After that water less often than you think you need to and make sure your pot drains completely after every watering. Most monsteras can pull through if the rot hasn’t spread to the crown of the plant.
How Often Does a Monstera Need to Be Repotted?
Young, actively growing monsteras might need repotting every year or even every 9 months if they’re really growing well. Bigger more established plants tend to settle into a slower growth rate and might be happy in the same pot for 2 or 3 years.
The honest answer is: watch the plant, not the calendar. The signs above – roots escaping, fast drying, growth stopped – are more reliable than any schedule. Some years you’ll repot, some years you won’t.
One thing worth knowing: monsteras can tolerate being slightly pot bound better than most tropical houseplants. They don’t need to be repotted the moment they fill their pot. If the plant looks healthy and is still growing it’s probably okay to wait a bit longer.
A Few Last Things Worth Knowing
Monsteras are more forgiving than you might think. Especially when they’re drooping a lot.
If you repot at the right time (spring), use well draining soil, get a pot that’s just slightly bigger than the current one, and try not to overwater afterward – you’ll almost certainly be fine.
The mistakes most people make, just for a quick recap:
- Going too big on the pot size (results in waterlogged soil and root rot)
- Using heavy, dense soil without doing anything to help with drainage
- Repotting in winter when the plant can’t recover well
- Overwatering immediately after repotting
- Fertilizing too soon and burning stressed roots
- Not checking the roots before putting the plant in a new pot
If you can steer clear of those then your monstera will thank you – probably with a some great looking new leaves within a few weeks of settling in.